Installation of Atmosphere and Troposphere
Overview
The installation of Atmosphere and Troposphere can be a complex task when done manually. Fortunately, the team behind the stack has created a deployment tool that attempts to remove some of the frustrations that one could come across. Clank is a deployment tool that uses ansible technology. It deploys the Atmosphere and Troposphere infrastructure within a Linux environment (perferably Ubuntu) to make using OpenStack fo on-demanding computing needs easy.
System Dependencies
Clank perfoms a local install of Atmosphere and Troposphere, and as a result, a few dependencies are required to allow clank to properly run.
The lines below allow clank to run its own series of commands to get ansible to run locally:
apt-get update
apt-get install -y python python-pip python-dev libffi-dev libssl-dev python-virtualenv git
Next, create a virtualenv and activate it. This will allow us to keep our python dependencies tidy and in one place without polluting the system.
virtualenv clank_env
. clank_env/bin/activate
Once the virtualenv has been created, clone down clank and install its dependencies in our virtualenv.
git clone https://github.com/cyverse/clank.git
pip install -r clank/clank_requirements.txt
If you perform a pip freeze, you should see new libraries added.
pip freezeRequirements for Configuration
A few files are required to be filled out in order for clank to properly function. You can find all the files below in the dist_files directory.
variables.yml (See variables dist for blank template)
hosts for
atmosphere-ansible(See hosts dist for blank template)group_vars for
atmosphere-ansible(See group_vars dist for two 'provider' templates)
Your hosts file and group_vars directory should reflect one another. This would include renaming the dist file to reflect the groups you wish to create with ansible.
When you fill out your hosts file and the provider templates in the group_vars directory, be sure to link the location of these files in the variable.yml file. At the current moment, the only vars that need to be filled in the new variable.yml are:
SERVER_URL:                       # myhostname.org

ANSIBLE_HOSTS_FILE:               #Absolute Path Recommended e.g. /path/to/my/hostfile/hosts
ANSIBLE_GROUP_VARS_FOLDER:        #Absolute Path Recommended e.g. /path/to/my/groupvars/dir/group_vars
Installation
Once you have the completed files, its time to run clank! Change directories into the clank repo.
cd clankIn order to override the default arguments for clank, we will need to pass in the variables.yml file we worked on previously.
VARIABLES_YML_FILE=/path/to/our/completed/variables.ymlAnd now we select the playbooks/deploy_stack.yml playbook to install the entire Atmosphere stack. Use --limit to define the target-host you wish to install atmosphere to.
Calling ansible-playbook
By default, Clank is configured to deploy against localhost. To deploy to a remote target, modify the hosts file, replacing the target-host: localhost to the correct Server/IP address.
# Note the '@' required when calling ansible-playbook
# playbooks/deploy_stack.yml will install the full Atmosphere Stack (Atmosphere, Troposphere, and atmosphere-ansible).
ansible-playbook playbooks/deploy_stack.yml -e @$VARIABLES_YML_FILE
Advanced Configuration
SSL CERTS
Installation of self-signed SSL certs
By default, clank will install self-signed SSL certificates. While this is fine for evaluation, it is encouraged to use letsencrypt or bring your own SSL certificates when running the Atmosphere platform in a production setting.
Bringing your own SSL certs
To have clank install your own ssl certs, rather than create the self signed certs, the following changes should be included in your variables.yml file:
# SSL RELATED VARS
CREATE_SSL: false                           # Set this to false if you wish to pass in your own certs

# If the above variable is set to true, do not edit next three vars below

TLS_BYO_PRIVKEY_SRC: /location/to/my/ssl/private/key/we/would/like/to/use/example.server.key         #Absolute Path Recommended
TLS_BYO_CERT_SRC: /location/to/my/ssl/cert/we/would/like/to/use/example.server.crt                   #Absolute Path Recommended
TLS_BYO_CACHAIN_SRC: /location/to/my/ssl/bundle_cert/we/would/like/to/use/example.server.cachain.crt #Absolute Path Recommended
Using letsencrypt to generate SSL certs
To have clank run letsencrypt, rather than create self-signed certs, the following changes should be included in your variables.yml file:
# NOTE: At least one valid email is requried for admin. If given, this user will be emailed when errors occur in Atmosphere, Troposphere, and for user contact/feedback.
ADMINS_EMAIL_TUPLE: [['Atmosphere Admin', 'valid-email@required'], ['Admin Two', 'valid-email@required']]

# SSL RELATED VARS
CREATE_SSL: false                           # Set this to false if you wish to pass in your own certs

TLS_LETSENCRYPT_ENABLE: true
TLS_LETSENCRYPT_EMAIL: "{{ ADMINS_EMAIL_TUPLE[0][1] }}"
SSH Keys
You can have clank install your previously created ssh keys of choice, rather than create new ones. To do so, make the changes to your variables.yml file:
# SSH KEYS
CREATE_SSH_KEYS: false                     # Set this to false if you wish to pass in your own ssh keys
ID_RSA:  /location/to/my/id_rsa_key/my_key_id_rsa                      #Absolute Path Recommended
ID_RSA_PUB: /location/to/my/id_rsa_public_key/my_key_id_rsa.pub        #Absolute Path Recommended
Atmosphere Plugins
The Atmosphere API has support for a few different types of plugins, that can be included or changed by changing the variables.yml file. Described below are the most commonly configured plugins, related to account and machine validation. For a full list, check the atmosphere settings dist file
Creating a new plugin for Atmosphere
If you are interested in creating a new plugins for atmosphere: 1) Fork atmosphere 2) Create the file and Class name in question. Most plugins will have a specific method signature that is expected, be sure thats included. 3) To install that plugin with clank, you will need to point to your repository and branch when filling out the contents of the variables.yml file. 4) Follow the instructions below and include 'your.plugin.path.ClassName' instead of one from the list.
Account Validation Plugins
Account validation plugins determine what users (after being authenticated by CAS/LDAP/Openstack/etc.) are authorized to use the Atmosphere platform. By default, the 'AlwaysAllow' plugin is used, ensuring that any user who is authenticated will be authorized to use atmosphere.
IMPORTANT NOTE:Account validation takes a list of plugins, ALL plugins will be tested for a given user. A user is only denied access when ALL Plugins fail for that user.
Additional choices for the Account validation plugin are: - 'atmosphere.plugins.auth.validation.LDAPGroupRequired' # Require that the user has a valid LDAP group - 'jetstream.plugins.auth.validation.XsedeProjectRequired' # Require that the user has a valid XSede project in TAS external API To select a non-default account validation plugin, include this line in your variables.yml
VALIDATION_PLUGINS = ['atmosphere.plugins.auth.validation.LDAPGroupRequired',]Machine Validation Plugin
Machine validation plugins determine what cloud provider 'machines' will be included in the Atmosphere imaging catalog (and viewable by users of Atmosphere). By default, the 'BasicValidation' plugin is used, ensuring that any machine that is found by the Admin user of the cloud provider will be included in the atmosphere image catalog.
IMPORTANT NOTE: Machine validation takes a single plugin.
Additional choices for the Machine validation plugin are: - "atmosphere.plugins.machine_validation.WhitelistValidation" # Accept images with specific metadata, (reject all other images) - "atmosphere.plugins.machine_validation.BlacklistValidation" # Reject images with specific metadata - "atmosphere.plugins.machine_validation.CyverseValidation" # Reject images with specific metadata & require author to be admin user.
To select a non-default machine validation plugin, include this line in your variables.yml
MACHINE_VALIDATION_PLUGIN = "atmosphere.plugins.machine_validation.CyverseValidation"Advanced Installation
Because clank uses ansible-playbook directly, there are lots of ways to break up clank's playbooks to deploy portions of the Atmosphere platform.
Tags
You are able to isolate which portions of clank you want to run specifically. To do this you can pass in the tags flag to the clank.py script:
# print-vars tag will print out ansible's interpretation of variables before making changes to the system
ansible-playbook playbooks/deploy_stack.yml -e @/path/to/my/clank-variables.yml -vvvvv -e "CLANK_VERBOSE=true" --tags print-vars

# atmosphere tag will install/update only the 'atmosphere' portion of the Atmosphere platform.
ansible-playbook playbooks/deploy_stack.yml -e @/path/to/my/clank-variables.yml --tags atmosphere
Skip
Inversely, you can skip sections of the installation by choosing tags to skip:
# You can skip these tags to save time if you are rebuilding the Atmosphere platform.
ansible-playbook playbooks/deploy_stack.yml -e @/path/to/my/clank-variables.yml --skip-tags "clone-repo,data-load,npm,pip-install-requirements,apt-install"

# and you can skip these tags if you just want to install the 'atmosphere' portion of the Atmosphere platform
ansible-playbook playbooks/deploy_stack.yml -e @/path/to/my/clank-variables.yml --skip dependencies,troposphere # skips over the installation of dependencies and troposphere
What to do after installing Clank
Starting the Atmosphere service and logging in
After you have run clank.py successfully, you will need to run:
service atmosphere startAt which point you should be able to point your browser of choice to https://<your_server_url>/. Login (via Mock, CAS, or the AuthenticationBackend you are using) and you should see your username in the top-right corner. 
Setting your user as staff and superuser
After you have logged in once, you will need to set your user as a staff/superuser.
Because you have to be a superuser in order to access the /admin page for Atmosphere, you will have to do this by the Atmosphere Python REPL:
# BASH:
[11:52 root@mickey atmosphere] > cd /opt/dev/atmosphere
[11:52 root@mickey atmosphere] > source /opt/env/atmo/bin/activate
(atmo_ss) [11:52 root@mickey atmosphere] > ./manage.py shell
# In the PYTHON REPL
from core.models import AtmosphereUser
user = AtmosphereUser.objects.get(username='sgregory')
user.is_superuser = True
user.is_staff = True
user.save()
Connecting to a Cloud Provider
Now that you have logged in and marked your user an administrator, you are ready to connect to the cloud. See Connecting a Cloud Provider.
Creating Accounts using Troposphere
To Add an account with Troposphere, select 'Create New Account' from the 'admin'->'Manage Accounts' tabs in Troposphere. A modal should appear asking for some information about the user:
Describing the 'Create Account' modal:
Atmosphere username - The username of the core.AtmosphereUser that will be retrieved/created and then assigned to the new identity. Atmosphere Group Name - The name of the core.Group that will be retrieved/created (connected to the Atmosphere Username) and then assigned (Membership roles) to the new identity. Provider - The Cloud Provider you wish to associate the new account with Quota - The quota you want assigned to your new openstack account (Uses Default Quota by default) Credentials - A list of key/value pairings that describe your user's openstack account. For a new account Create a new account - If true, only key is required as a credential, password/tenant name will be generated and saved to the identity. If False, all three credentials (key, secret, ex_project_name) are required. Is this an admin account - If true, (create a new account should be False, here) the account is provisioned differently and then linked to the provider.
Upon creation, Atmosphere will test the identity. If for any reason the identity does not produce a valid rtwo.Driver the identity will be deleted and an error message will be thrown.
Adding the admin account to your new provider
Before you can start adding accounts, you need to designate an identity as "the admin account" for the new provider. Doing this grants you access to create new accounts, manage users within openstack, as well as monitoring and imaging services through Atmosphere.
After you create the account, you should see it appear in the list of "Identities" just below 'Create New Account' button in Troposphere.
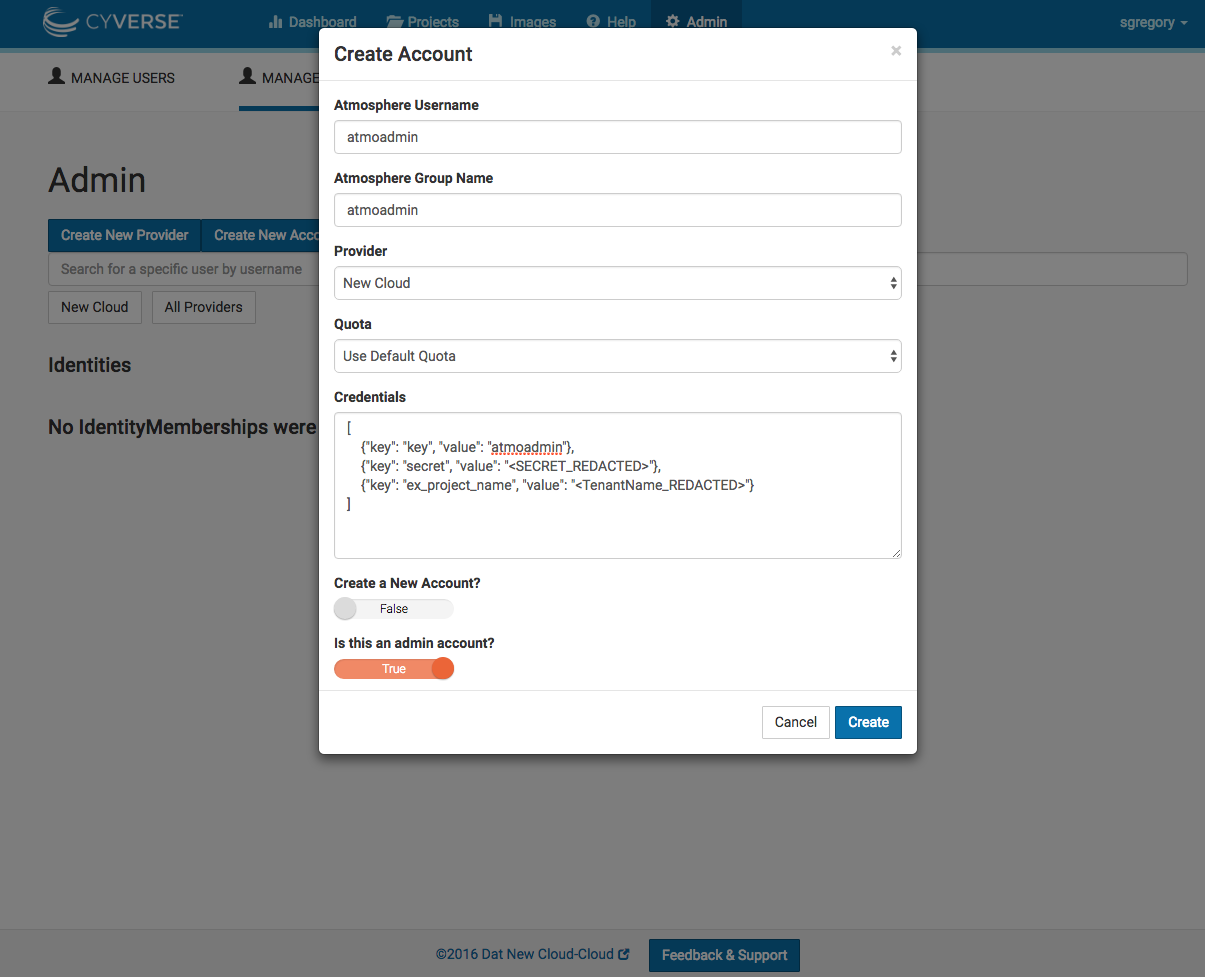
Troposphere admin account creation
Adding a new user account to your new provider
Creating a new account is a simpler process, you can use the description above and the screenshot below to help answer the question of whats required.
Account creation takes a few seconds more than admin account creation (to be sure all of our pieces are properly adjusted).
Upon creation, Atmosphere will test this identity. If for any reason the identity does not produce a valid rtwo.Driver the identity will be deleted and an error message will be thrown.
After account creation, you should see it appear in the list of "Identities" just below 'Create New Account' button in Troposphere.
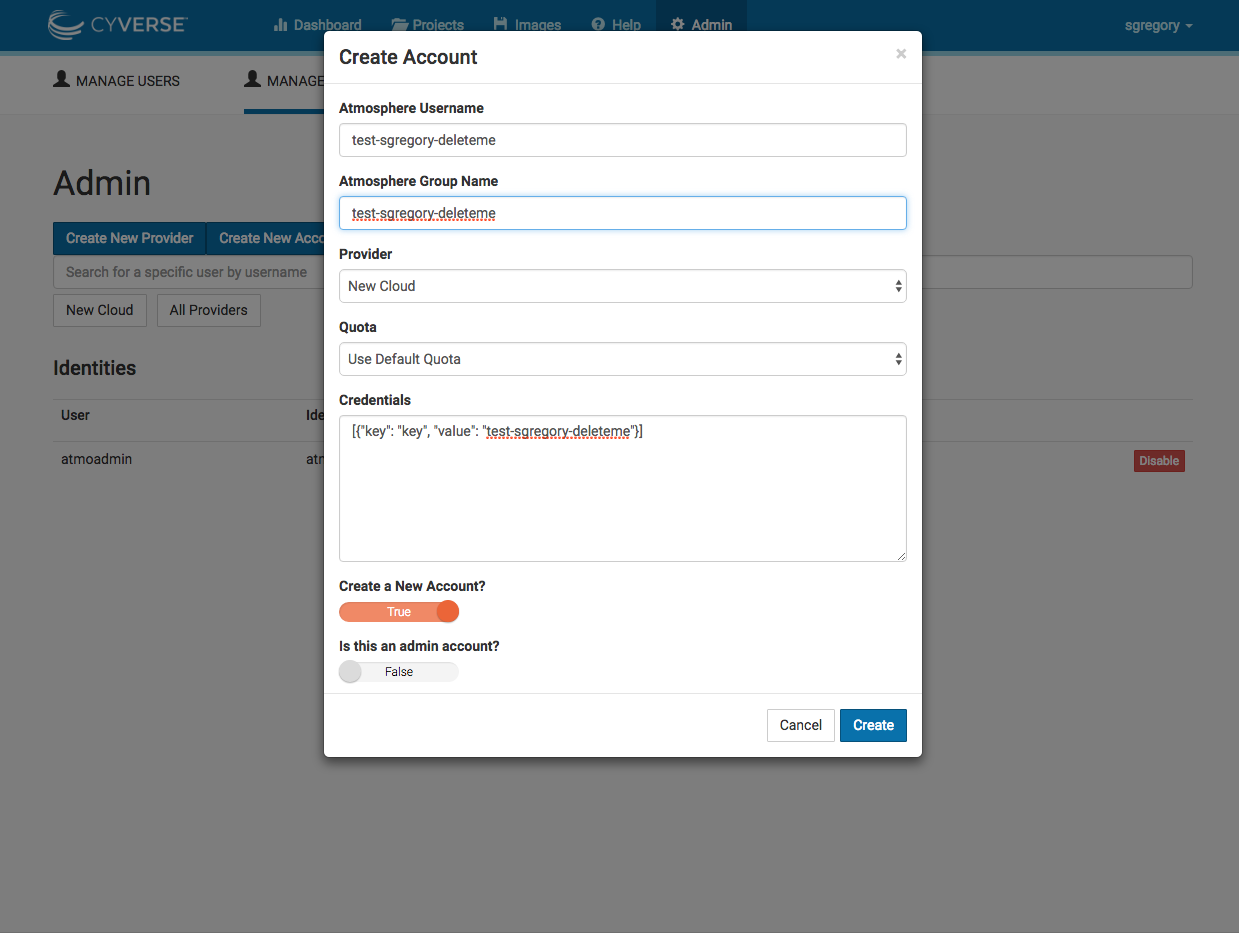
Troposphere user account creation